This 5:30 Video goes over some of the new features in QwikTouchPro and how we can use them to integrate with Keystroke to create custom sales screens -

Friday, November 18, 2011
Saturday, November 12, 2011
Video (Part 2) – Using the Dataview to Show Filtered Popup Windows
This 14:09 video walks through using the dataview from part 1 to display a popup list of inventory items that will be filtered by department.
Part 1 of this video can be found here -
Note – a note about renaming controls. QwikTouchPro refers to controls by name. Once you start referring to controls in the Source Control Builder you have to be careful when renaming them.
For e.g. When we touch our ‘InventoryList’ dataview in the video, we send the stock number of the selected item from a dataview called ‘Iventory List’.
If we rename the dataview to something else QwikTouchPro can’t find it and the macro will fail (quietly).
Be aware that copying controls (even between templates) renames them. If you copy InventoryList it will be pasted as DataView17 and must be renamed for the macros to work.
Video (Part 1) – Using a Dataview with a Keystroke Inventory Export to Auto Generate Keys
This 11:17 Video walks through using a Dataview to display a list of Keystroke inventory items.
The dataview is a scrolling list that can display data from various datasources. In this video we use a Keystroke inventory export as the data source, and setup a dataview with a macro that adds the selected item to the current invoice when touched/clicked.
The steps covered in the video are:
· Export the Keystrok inventory
o This creates the qtpexport.txt file we will use as a datasource
· Create a QwikTouchPro datasource for the qtpexport.txt file
o This file tells QwikTouchPro where to find the export file and how to read it
· Create an item template
o A small template that tells the dataview how to display the items
· Add a dataview using the datasource and item template
You can update/add/remove keys to the dataview by updating your Keystroke inventory and then re-running the export. You can refresh your inventory (re-run ksexport.exe) from QwikTouchPro using macros and/or timers to keep your inventory keys as update to date as you need them to be.
Wednesday, November 9, 2011
String Formatting
There are several places in the QwikTouchPro Editor where you can provide an optional string format.

We use string formatting when we are retuning a value from a Datasource or another control and we want to change the way it is displayed.
String formatting is how we convert 7.2 to $7.20, or “11/8/2011” to “November 8, 2011” for e.g.
As of this writing, you can apply a String Format in the following places –
- Data Binding (Data Tab, Data Binding Group)
- Source Control Builder (Anywhere you see this icon -
 )
) - DataGrid Columns (Data Controls Tab, Datagrid Group, Configure)
One of the more common uses for string formatting will probably be to format prices from Keystrokes as dollar amounts. When you create a Customer Display or a collection of inventory items they are displayed the way they come out of the Keystroke Data port or Export.txt files.
This often means 0, 1, 1.5, or 17.32, when what we really want to see is $0.00, $1.00, $1.50, or $17.32.
To accomplish this we can apply a String Format to the price to convert it from a number to a dollar amount (currency).
The string format for currency is –
{0:c}
Here is an example of a currency string format being applied to the Amount Due field from the Keystroke Dataport –

Here is a great link to some string formats –
(Scroll down to where the string format examples begin)
And here is a link of some common examples –
You can also use string formatting to specify the image for a Keystroke Inventory Item.
We know that the Images in Keystrokes are named I[StockNumber].jpg.
If we know the Stock Number of an item we can build the path to its image with string formatting.
{0} is a token that represents the string we are formatting (the Stock number of the selected item for example).
To get the full path of the image we would format the string as –
C:\Keystrok\Tutor\PHOTOS\I{0}.jpg
At runtime, QwikTouchPro will replace the {0} with the stock number of the selected item.
The QwikTouchPro System Tray Icon
When QwikTouchPro (not the QwikTouchPro Editor) is running you will see an icon for it in the system tray (lower right hand corner of your desktop by the time).

Note - Windows 7 hides System Tray icons by default, if you do not see the QwikTouchPro Icon click the little up arrow in the system tray to see all hidden icons (you can also set the QwikTouchPro Icon to always show here as well).
The System Tray icon performs several functions –
· It lets you know QwikTouchPro is running
· You can quickly minimize or restore QwikTouchPro by double clicking on the icon
o This is a quick way to temporarily minimize QwikTouch so you can work with your desktop or other applications that may be behind your current template.
· You can right click the Icon to change your QwikTouchPro configuration
If you right click on the QwikTouchPro icon in the system tray you will see the following menu options –

Always On Top – If checked, QwikTouchPro will display on top of all other open applications.
This is the default behavior for QwikTouchPro but you may want to temporarily toggle this so you can interact with other windows and applications.
Show in TaskBar – This option will display all open templates on the taskbar. The default is disabled.
Open Template –This option allows you to browse to a template to open. The template will be displayed using its default options as specified in the QwikTouchPro Editor.
Note – The recommend method of opening QwikTouchPro Templates is to associate the template files (*.qtt) with the QwikTouchPro.exe executable. You can then open any template by double clicking it.
Start Server- This option starts the QwikTouchPro Server allowing you to control this display from other computers on your LAN or the Internet.
Note – This option can be enabled by default in the QwikTouchPro Properties dialog.
Stop Server – This option stops the QwikTouchPro Server.
Properties – Opens the QwikTouchPro Properties dialog (see this Post)
About – Displays information about your QwikTouchPro installation.
Exit – Closes all open templates and exits QwikTouchPro.
QwikTouchPro Properties Dialog
When you select the Properties option from the QwikTouchPro system tray you will see the QwikTouchPro properties dialog –

Media Folder – The default location for your media files (Images and Videos).
When you add an item from your Media folder to your Canvas (in the QwikTouchPro Editor) QwikTouchPro changes the Path to \Media\[ImageName.png].
This allows you to have different Media Folders for different installations.
Instead of all installations using c:\program files\QwikTouchPro\Media as a default location, each installation can have its Media Folder. As long as the image you are referencing exists in the users default media folder QwikTouchPro can find it.
Note - If you add images that are not in your default media folder you will be prompted to copy them into your default media folder. If you say no, the image will be referenced from its actual location, meaning any templates that use that image must have access to it.
e.g. You could add an image from a \\ServerName\Images folder as long as all of your client installs have access to that folder.
Template Folder – Default location for your QwikTouchPro Templates and Custom Controls.
This works the same way as the default Media Folder.
Programs Folder – Default location for your QwikTouchPro Program and Datasource files.
This works the same way as the default Media Folder.
Warning – QwikTouchPro and the QwikTouchPro Editor can use different default locations, but in most cases you will want them to be the same.
For e.g., if you change your default Media Location in the QwikTouchPro Editor but NOT in QwikTouchPro, your images will not display because QwikTouchPro is looking for them in the wrong place.
If your templates folder is not the same you will see errors about missing templates because you are telling the editor to look for templates in a different place than QwikTouchPro.
Advanced Tip – The default folders can be configured independently, this can be especially useful in installs with more than 1 Register.
e.g. You could have the Media and Template folders point to a network location for all Workstations, but have the Programs Folder be local.
Each installation would share the same images and templates (they only need to be updated on the server).
Each installation would also use its own local Programs (keystroke.qtp for example).
Each workstation can run an “Open KeystrokePOS” macro on load, and depending on the workstation a different Keystroke Configuration will be used (Reg 1, Reg 2, Reg 3).
Click Sound – This is the sound file that is played when a user touches a key in QwikTouchPro.
You can browse to a new sound file or make this blank to disable the click sound.
Click Animation – When enabled, keys will shrink slightly when they are touched/clicked as feedback to the user.
Server Port – The port the QwikTouchPro server should run on
Auto Start Server – Start the QwikTouchPro server automatically when QwikTouchPro opens.
Idle Time - How long (in seconds) should the computer be idle before QwikTouchPro fires an “Idle Time” Macro.
Idle time macros can be set for each template from the QwikTouchPro Editor, Templates Tab, Macros Group, Edit Button.
Idle time macros can be used like a screen saver to show advertising or images when the computer is idle, or to “reset” a KIOSK when people walk away from it (in case the user leaves the KIOSK on a different template than the startup template for e.g.).
Logging Mode – This controls how QwikTouchPro displays warnings, errors and messages.
Options are:
None – No messages will be logged or displayed
Log File – Write all messages to a log file
Message Popup – Display a pop-up window for each message.
You may want to set the Logging Mode to Log File so the customer does not see every message, but you can still check the log file for trouble shooting.
Video - Creating a Keystroke Customer Display
This 15 minute video walks through creating a simple Keystrok customer display in QwikTouchPro.
A customer display is a template that displays real-time sales information as it is entered into Keystrokes. Customer Displays can also display advertising and might be run on a second monitor or other remote display where the customer can see them.
The steps to create a Customer Display are detailed in the Video, but they are –
o Enable the Dataport in KeystrokePOS
o Create a Datasource in the QwikTouchPro Editor
§ A configuration file that points to the Keystroke Dataport
o Add (and Bind) Text controls for the invoice data
o Add (and configure) a Datagrid to display the line items
The Customer Display created in this video very basic. Your actual customer display can contain media (Images, Videos, Flash Videos, Web Pages) as well as dynamic advertising and advanced macros.
Your customer display could, for example, display different information depending on the current sales invoice -
· Show different customer displays to different customers
o Walk-ins can see a different Customer Display than your regular customers
o Customers could be flagged in your Keystroke Database to allow for more customized displays
§ E.g. Mark a Customer a “GoldClub” member and show them a fancy golden template with specific advertising
· Display a message (or Template, or Sub-Template) depending on the Invoice Total
· Display custom advertising/info about the department of the last item added to the sale
· Display an image of the last inventory item added to the sale
· Much More...
Datagrid Options

I didn’t talk about these in the video so here is a quick overview –
Scroll to Last Row on Update – This option scrolls the Datagrid to the bottom when an item is added. With a customer display you will probably want to show the bottom of the list of Line Items and not the top, so that the customer will always see the last item added.
Select Last Row on Update – This option selects the last row (but does not scroll to it) of the Datagrid when an item is added. You can use this to highlight the most recent item, and also to create macros.
Play Click Sound on Selection – This option will play the default click sound when an item on the Datagrid is selected (by touching it, or via the “Select Last Row on Update” option).
You might disable this option when using the “Select Last Row on Update” option so don’t hear the click sound as items are added to the sale.
The default click sound can be changed by right clicking the QwikTouchPro icon in the system right and choosing properties (requires that QwikTouchPro be running).
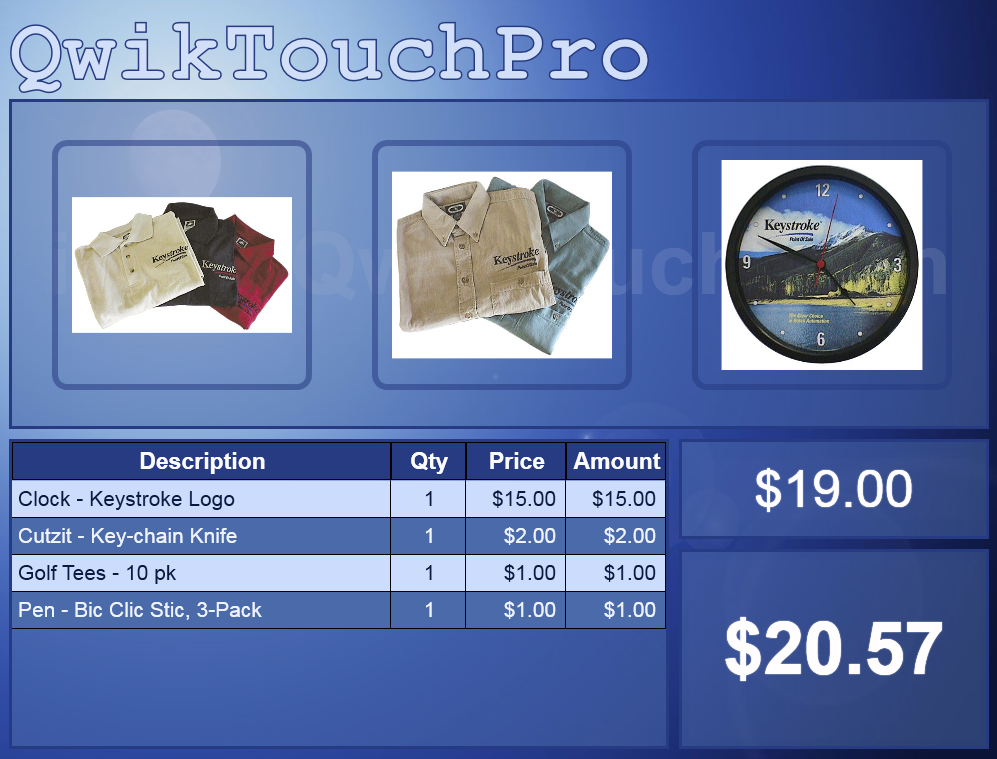
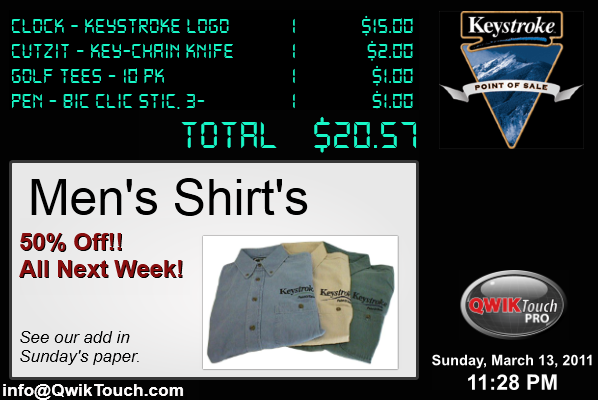
Here are a few sample Customer Displays from an earlier Blog Post.
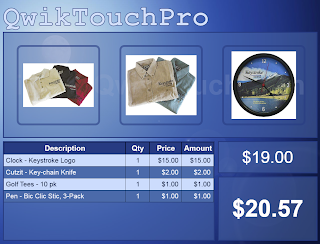


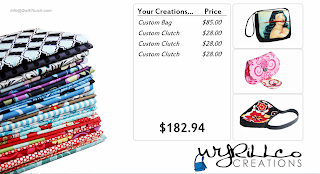
Here are a few sample Customer Displays from an earlier Blog Post.


Subscribe to:
Posts (Atom)